![]()


Mars Exploration Rover Project:
A Status Report
by Steve Bartlett
The chapter began its project to build a full-scale, working model of the NASA Mars Exploration Rover at the end of 2003. The goal was to have a group activity that, on completion, we could take to our public events, display booths, school visits, and the like to show how the real rovers looked and worked. As the MER probes Spirit and Opportunity roamed around the Martian surface, OASIS' rover could travel around conference rooms, parks, and auditoriums.
The first part of the project was to make sub-scale paper models of the rover. The website, www.lansbergen.net, has an excellent set of easy-to-build plans in PDF format that can be downloaded and printed on an inkjet or laser printer. All it takes to make your own 1/15th scale rover is some paper, a pair of scissors, and some glue. (We used 100 lb. card stock available from any office supply store instead of common bond paper because it's stiffer and holds up to handling much better.) These models also make great, inexpensive gifts for your space-inclined friends.
The next step in our effort was to build a ¼-scale model of the rover out of stronger materials which would have a few moving parts. The materials used for the second model were:
- 1/4" plywood for the top platform, solar array "wings", box body, "rocker bogey" wheel attachment frames, and wheel hubs,
- 1" PVC tubing for the camera mast and cross-piece
- 2-1/2" cardboard shipping tube with four layers of fiberglass for the wheel rims,
- 3/8" wooden dowels for the wheel axles and rock abrasion tool,
- 1/4" wooden dowels for the robotic arm connecting the rock abrasion tool to the body, and
- Miscellaneous piece parts, including bolts, screws, hinges for the solar wings, and pop rivets.
We chose these materials because they were inexpensive, readily available, and easy to shape using commonly available tools.
We found that the Lansbergen plans could be enlarged with a photocopier to create usable drawings for our cutting patterns. A little work with a table saw, a jigsaw, a sander, and a few cans of spray paint gave us a very serviceable model that fit well on a tabletop. The results of our labors were displayed in an issue of the Odyssey a couple of months ago.
 |
| This picture isn’t actual size, but this Rover model will be the same size as Spirit and Opportunity! |
(As a side note: We took this model to a party attended by several of the Jet Propulsion Laboratory MER employees a few months ago and they were suitably impressed.)
Now that the sub-scale models are done, its time to move onto the "real thing." The full-size rover will be about the size of a golf cart and weigh somewhere around a hundred pounds when all of the motors, batteries, structure, and other parts are taken into account. Clearly, this is going to be a big project.
Thus far, all of the rover work we've done has been performed by a couple of people. While this has been adequate for making the subscale models, it probably isn't enough to allow us to build the full size unit at a reasonable rate. So we're going to need some more people. (Any volunteers?)
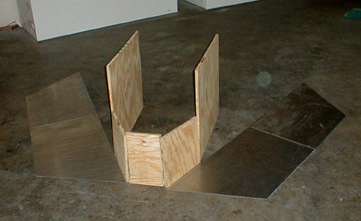
We'd like to make this rover as lightweight as possible so we can transport it to our events easily but we don't want it costing an arm and a leg. Sheet aluminum 1/16" thick is light-weight and strong, but is somewhat expensive. Plywood sheets are relatively inexpensive, but they're heavy and too thick to make realistic looking solar wings. (It can also be difficult to hide the wood grain without doing a lot of sanding.) So we chose to make the “tabletop” triangular section and the solar array wings out of sheet aluminum and to make the rover body out of plywood covered with gold metal foil.
Thus far, our team has cut out the left and right solar array wings and part of the body sections. The next step will be to cut the “tabletop” triangular piece out of our sheet metal and to get more plywood to finish cutting out the sections of the main body. The photo on page three shows the progress to date.
If you'd like to see this project move forward faster and you're handy with tools or electronics, please feel free to lend a hand on our rover.
Copyright © 1998-2005 Organization for the Advancement of Space Industrialization and Settlement. All Rights Reserved.